So… you’ve messed up your photo? You were trying to capture a straight shot for once and it turned out to be crooked. Maybe an additional finger slipped in the frame. You’re probably cursing the one who slipped his finger into the frame. Or forget all this, you just need to enhance how your box of pizza shapes up in the image.
Thankfully, you don’t need to download a whole additional app to edit the mess. Apple offers all the necessary tools you’d ever need to perform minute fixes and enhancements to your photos right in the Photos app on your iPhone.
The photos app is a powerhouse as well as a portal of sorts. It’s a portal because it is the only way you can share and manage photos on your iPhone. There are also other apps available on the App Store that help extend the management functions for your photos but they just offer services that you don’t often need.
It’s a powerhouse cause it hosts a multitude of AI-backed photo management features that work rather proficiently. And out of the many things the photos app on the iPhone can do, this one’s my favorite: it automatically identifies faces in photos and groups all the photos containing that face. Then, you can conveniently name that group of photos based on the person and further access just those photos by searching the person’s name. It seems magical, but it’s purely the essence of what AI can be used for on an iPhone.
So, now that we know the potential of the photos app, let’s see how you can perform basic edits such as crop, rotate, straighten, as well as add filters to your photos on your iPhone.
How to crop a photo in Photos for iPhone and iPad
Cropping a photo is one of the most basic photo editing functions. No wonder it’s easily doable right within the Photos app.
Steps:
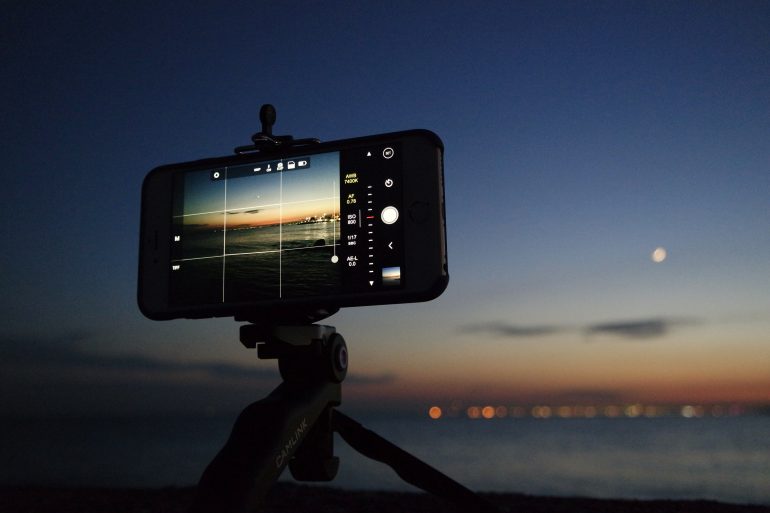
- In the Photos app on your iPhone, open a photo that you’d like to crop.
- From the options above the photo in the right-hand top corner, tap “Edit.”
- An editing interface will appear. Tap the icon showcasing interlaced lines with curved arrows at its corners. That is the crop and straighten button. Tap it.
- A square outline with corner controls will appear around the photo.
- Drag these corner controls up to the point you want to crop the photo.
- Tap on “Done” once you are done cropping. You will now notice the cropped version of your original photo in the album.
How to rotate a photo in Photos for iPhone and iPad
The default camera app on your iPhone, sometimes, can suddenly detect a change in orientation and can capture the photo in landscape orientation when you originally intended to do so in portrait. It’s a bummer, for sure, but there isn’t any way you can turn off auto-rotate in the camera app.
The issue doesn’t solely emerge from within the camera app. Sometimes, others also share wrongly oriented images.
The only solution, then, is to rotate the photo manually after you have accidentally captured the unintended shot.
Steps:
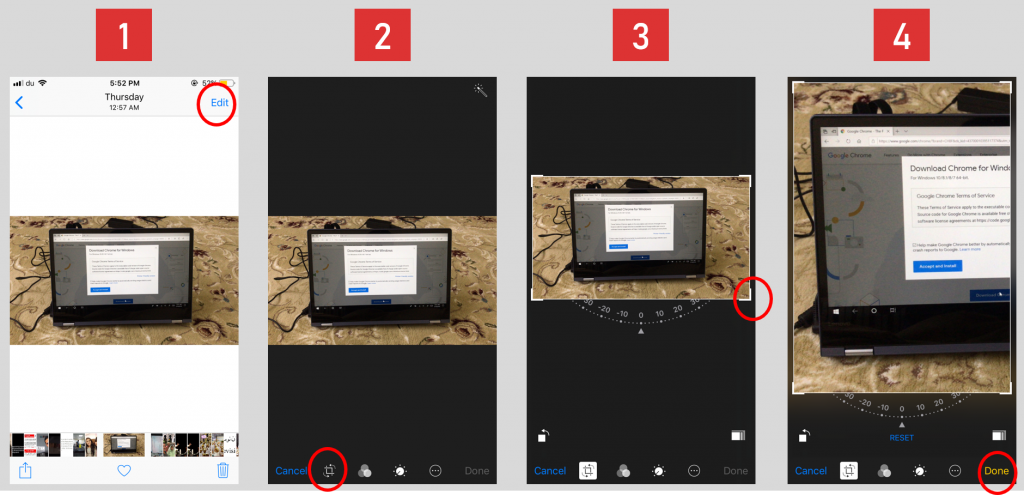
- In the Photos app on your iPhone, open a photo that you’d like to rotate.
- From the options above the photo in the right-hand top corner, tap “Edit.”
- An editing interface will appear. Tap the icon showcasing interlaced lines with curved arrows at its corners. That is the crop and straighten button. Tap it.
- Now, you will notice a little square with a curved arrow around one of its corners denoting the rotating feature.
- Tap on it until you obtain the desired orientation.
- Tap “Done”.
How to straighten a photo in Photos for iPhone and iPad
The process for straightening a photo is similar to the above processes. It’s also just another way to make up for your ignorance of photography.
Steps:
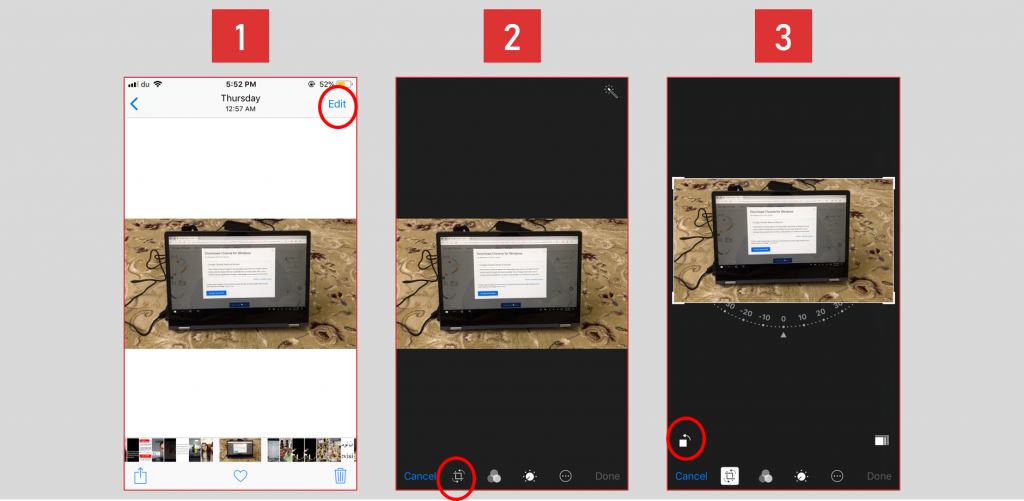
- In the Photos app on your iPhone, open a photo that you’d like to straighten.
- From the options above the photo in the right-hand top corner, tap “Edit.”
- An editing interface will appear. Tap the icon showcasing interlaced lines with curved arrows at its corners. That is the crop and straighten button. Tap it.
- You will now notice a degree measure below the photo. Glide your finger over it and set the desired angle to which the photo needs straightening.
- Tap “Done”.
How to add filters to your photo in Photos for iPhone and iPad
You don’t need to explicitly download an extra app just to add filters to your photo on iPhone, especially if you are not too savvy about filters. This is because Apple offers ten of them in the Photos app itself.
Here’s how you can apply them.
Steps:
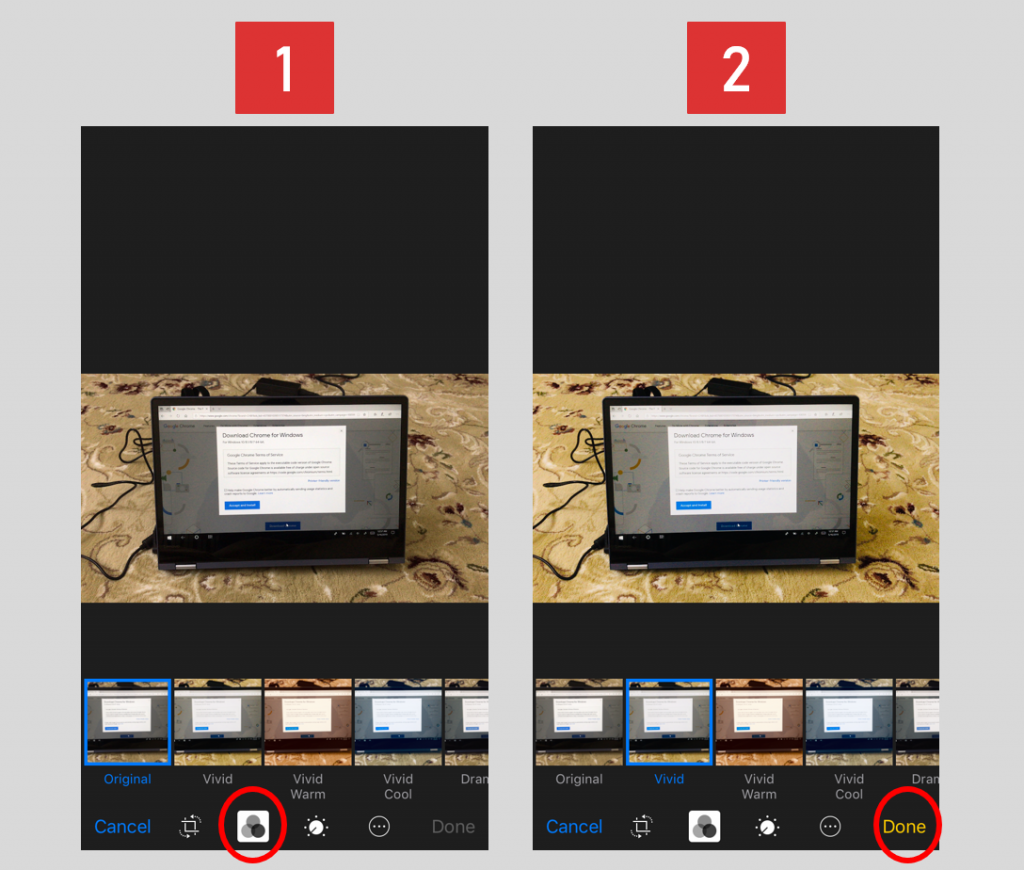
- In the Photos app on your iPhone, open a photo that you’d like to apply filters to.
- Tap on the filters icon which looks like three circles overlapping each other like a Venn diagram placed beside the crop button.
- Choose a favourable filter among the ten options available.
- Tap “Done”.
Conclusion
It’s not easy dealing with photos. Not on your DSLR, your PC, your iPhone or anywhere. But Apple has made the process fairly simple and compact. Thanks to the in-built editing tools in Photos, regular users don’t need to struggle with complex photo editing apps from the App Store just to get a few fixes done.
And don’t worry, you’re free to fuck up more often.
