I think it is safe to say, Apple has built its ecosystem beautifully. Comprehensively, too. It’s almost as if you’re living in a walled garden, meaning, everything in this garden, inside these walls, is as beautiful as it gets.
If you didn’t really get the gist of what I’m talking about, let me brief you up.
Apple makes a variety of products, right from an iPhone to a mini version of the HomePod. Along with these products, Apple builds its software in such a way that it’s all intertwined and working in harmony.
Services like AirDrop, CarPlay, iCloud, and the continuity that you get while switching from one device to the other.
AirDrop is probably the most widely used, closely followed by iCloud.
Imagine that you’re editing a video, on a Windows PC. You’re very close to the deadline, and there are still a few shots that you need to take. Rather than taking out your DSLR, you take your iPhone with you.
When you come back, you start uploading the shots to Drive but that’s too slow. You can’t share the videos via the lightning cable, and you don’t even have an iMac, so you can’t even AirDrop them.
What if I tell you that you can still wirelessly transfer your videos and photos, from your iPhone to your Windows PC, not via AirDrop but something suspiciously close.
What is AirDrop?
AirDrop is a proprietary file sharing service that Apple has created for its devices including the iPhone, iPad, iPod, and Mac.
It uses Bluetooth to establish a peer-to-peer Wi-Fi network between devices, enabling you to share files between devices even when you don’t have an active internet connection.

All you need to do is turn on both WiFi and Bluetooth on the devices you want to conduct the transfer. It’s the most efficient way of sharing files between your Apple devices.
Since AirDrop primarily uses WiFi to share files, it’s sufficiently fast enough to transfer even large files. By contrast, some apps that transfer files over Bluetooth instead have much slower transfer speeds.
Android, for one, uses a combination of Bluetooth and NFC to share files between computers and other Android smartphones. However, AirDrop is even faster than that, thanks to WiFi.
AirDrop is also much more secure than other file transfer methods. Each device participating in the transfer establishes a firewall around the connection and encrypts the file that is to be transferred.
This way, a bad actor cannot snoop into your connection and steal the content of the transfer.
Other modes of transferring files including Bluetooth aren’t as secure and polished as the AirDrop experience, which is what makes AirDrop so great.
In order to share a file between two devices, the devices need not be in extremely close proximity.
For instance, you can AirDrop a file from one Apple device to another Apple device sitting in another room.

However, Apple recently started including U1 (Ultra Wide Band) chips in its devices, and the way it aids AirDrop is that it accurately points to the direction of the receiving device.
It isn’t the most useful implementation of UWB, but Apple felt that AirDrop was a starting point. The company plans to implement UWB in its highly-rumored Tile-like trackers called AirTags in the future.
Another notable aspect of AirDrop is that it lets you transfer almost anything and is not limited to photos and videos.
For instance, you can also pop links and map locations from one device to another aside from documents and photos while everything is tightly integrated with Apple’s software.
Can you install AirDrop on Windows?
If you’ve ever asked “how do I transfer files from iPhone to a Windows computer,” you might have assumed that you could simply AirDrop files from your iPhone to a PC. Unfortunately, that’s not the case.
Apple does not offer AirDrop on Windows.
The primary reason that Apple is restraining itself from doing that is that it cannot establish the same level of security on the connection. Since Apple devices have firmware that creates a firewall and encrypts files before sending them over the connection, it’s possible to transfer files on Apple devices.
However, since Windows cannot decrypt the files by itself (since they’re encrypted by Apple’s proprietary software), AirDrop does not exist on Windows.
Sure, Apple can solve this problem by creating a standalone AirDrop app for Windows PCs, but the iPhone maker is not much of a stickler for cross-platform compatibility and loves to keep people in its walled garden.
Another ubiquitous speculation is that Apple considers Windows to be a less secure operating system and hence has opted to avoid making its software available on it.
Despite the unavailability of AirDrop on Windows, there are a ton of lucrative third-party services that offer the same kind of file-transfer functionality. Some of them are on par with Apple’s service, if not better, which technically means you can “AirDrop” from iPhone to a Windows PC.
Read along to learn how to practically “AirDrop” from iPhone to PC.
Can you transfer photos from iPhone to PC via Bluetooth?
While you can now pair your iPhone to your Windows PC via Bluetooth (you previously couldn’t), the connection is mostly useless depending on your perspective.
If you were hoping to transfer documents and photos via Bluetooth to your Windows PC, it isn’t possible.
However, Windows has a neat integration with its apps on the iPhone. Once you connect your iPhone to your PC over Bluetooth, you can use Microsoft’s revamped and greatly improved Edge browser to send links from your phone to your Windows PC.
For example, when you are reading an article on your phone and you’d rather prefer to read it on your PC, you can continue accessing that link on your PC.
That feature is called “Continue on PC.” Microsoft has also created a separate iPhone app with the same name for users who don’t prefer using the Edge browser.
The app enables a share sheet extension that you can access from anywhere on iOS to share a link to your Windows PC.
When you send a link using the extension added by the standalone app, the link opens up in whatever you’ve set as a default browser on your PC.
How to ‘AirDrop’ from iPhone to a Windows PC
AirDrop isn’t officially available on Windows. But there are numerous alternatives to Apple’s acclaimed file -sharing service.
In this post, we’ll learn three different methods to transfer files from iPhone to a Windows computer.
- Using Snapdrop.
- Using Send Anywhere
- Using Simple Transfer
Using Snapdrop

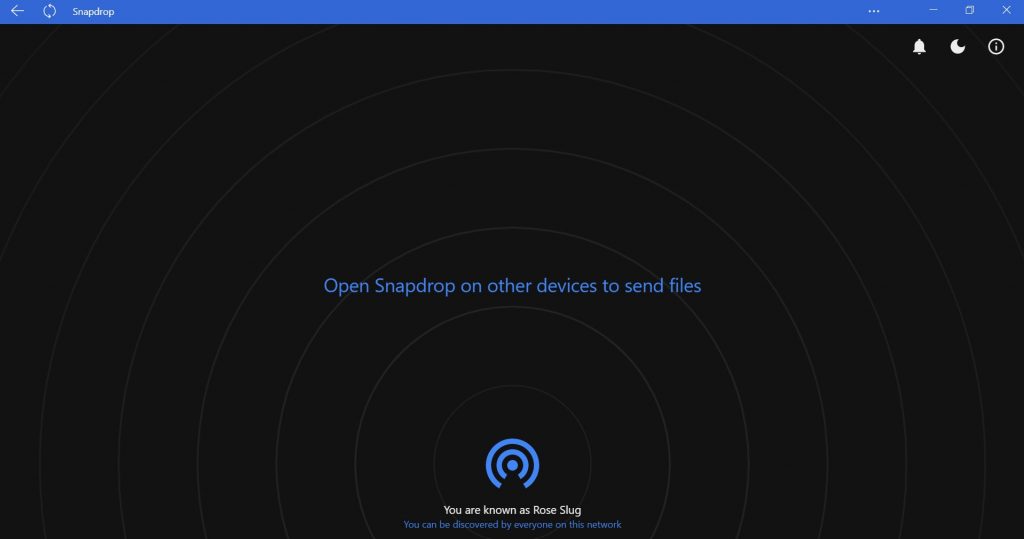
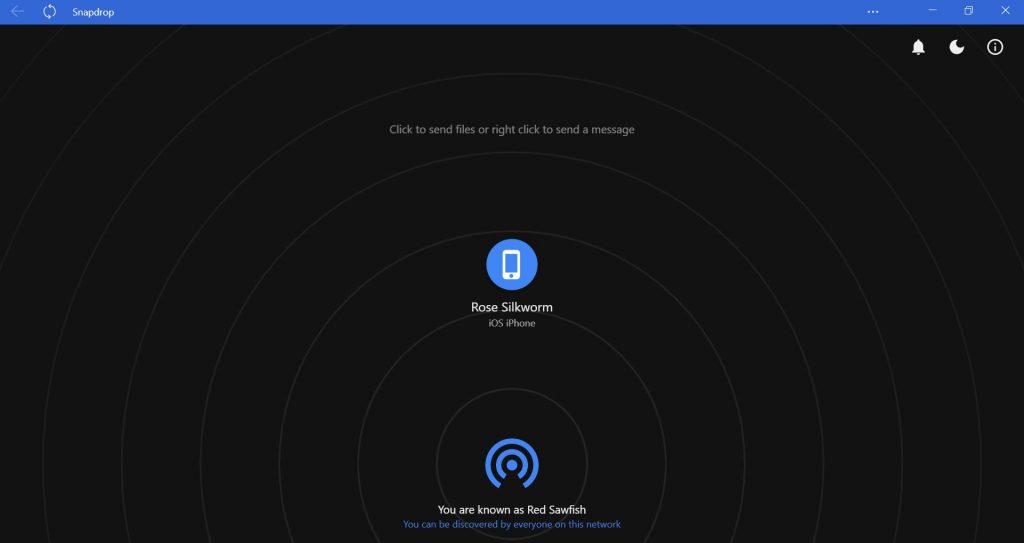
Snapdrop is the closest equivalent of AirDrop on Windows. It’s unbelievable how similar it is. Snapdrop features the same design with the concentric circles radiating outwards. It also has a dark mode that you can enable with the tap of a button. And funnily enough, the app gives you different names each time you access it to replicate Apple IDs. This time, I’m Rose Silkworm.

Snapdrop is essentially a PWA (Progressive Web App). Here’s an article from Smashing Magazine explaining everything there is to learn about PWAs. But the short version is that it crams whole websites into applications and makes them behave that way.
Thankfully, Snapdrop is available to download on Windows as a PWA, meaning you won’t need to fire up your browser each time you need to transfer a file.
Transferring files with Snapdrop is also relatively fast and the whole transfer process looks identical to AirDrop. However, I’m afraid it’s worth noting that Snapdrop is slower than AirDrop as it only uses a regular P2P (Peer-to-Peer) connection based on Wi-Fi while encrypting file transfers using WebRTC, which is a common file encryption standard.
AirDrop, on the other hand, is more reliable and fast as it uses Bluetooth to create a connection while files are transferred over Wi-Fi with Apple’s own encryption. Ultimately, though, a file transfer service is only as fast as the read and write speed of the devices conducting the transfer.
This means that while transferring photos and small files is a breeze, transferring larger files may take some time. You should use a wired transfer method for larger files anyway, as AirDrop and other similar apps are better suited for intermittent, smaller file transfers.
How to ‘AirDrop’ from an iPhone to a Windows PC using Snapdrop
There are two ways you can use Snapdrop on Windows: as a website via a browser or as a PWA. The easier way to access Snapdrop is to first install it as a PWA on your computer as this way, you won’t need to go through the additional steps of firing up your browser and typing in the URL every time.
How to install Snapdrop on your Windows PC
Note: I’m using Microsoft Edge as my preferred browser for this tutorial, which uses Chrome’s engine and is very similar to Google Chrome.
- Open a browser that supports PWA (Progressive Web Apps). Most browsers today support them, including Chrome, Edge, and Mozilla Firefox.
- If you are using your Windows PC to browse this article, simply click on this link to go to Snapdrop. Otherwise, type in https://snapdrop.net in your browser’s URL bar and hit enter.

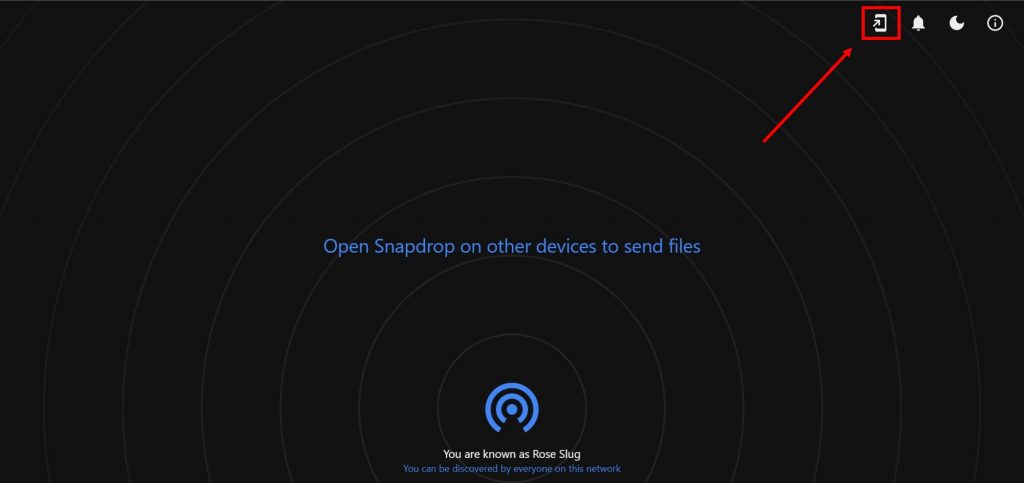
- Once the website is loaded, you should be able to see a button in the top right corner with an icon of a phone with a tilted arrow. Click that button.
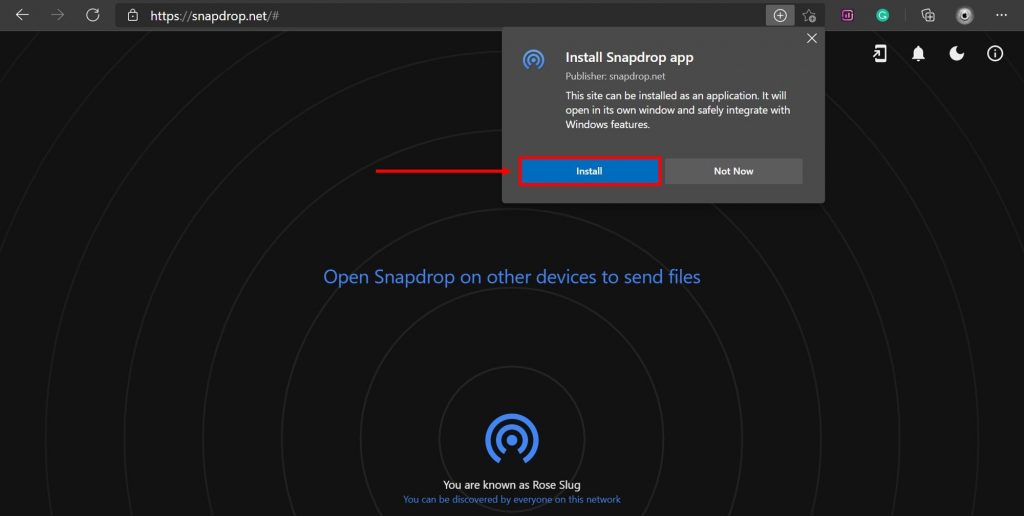
- Once you tap the button, a popup will appear on the top asking whether you want to install Snapdrop as an app. Click Install.
That’s it. Once Snapdrop is installed, you’ll be able to access it just like any other app from the Windows’ start menu, or even pin it to the taskbar. It’s worth noting that the app is simple in nature and doesn’t require any additional steps to set up.
How to install Snapdrop on iPhone
Unfortunately, Snapdrop does not offer an iOS app that you can download from the App Store. It works entirely on a browser. This means in order to transfer files to and from your iPhone or iPad, you’ll need to fire up a browser and go to Snapdrop. This involves a lot of steps and can be daunting when you quickly need to transfer something.
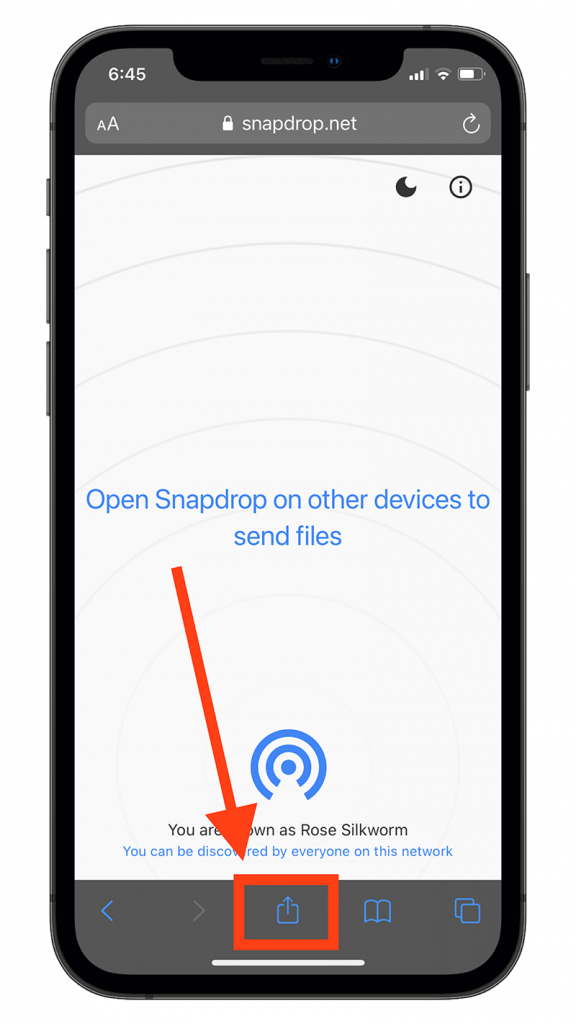
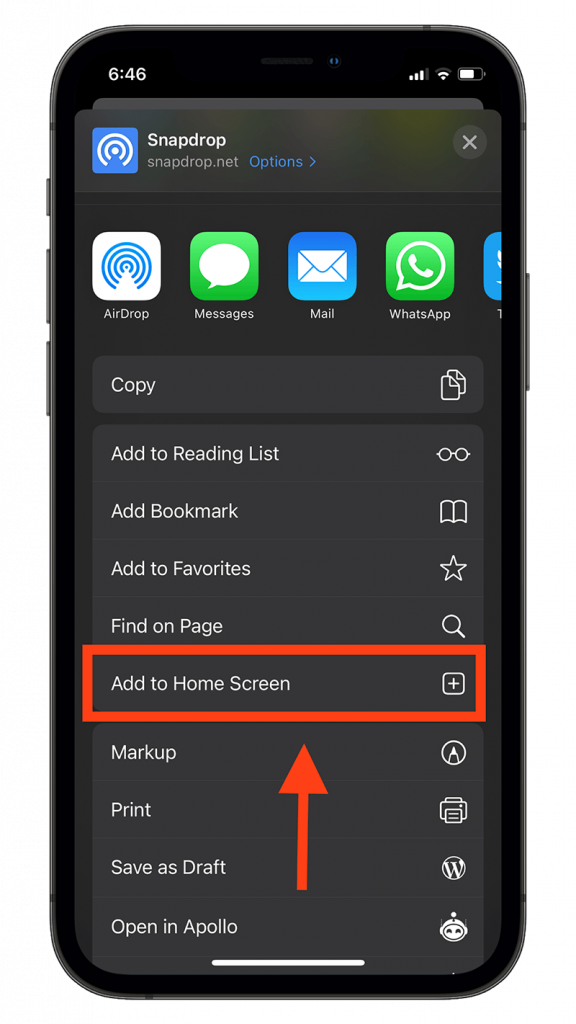
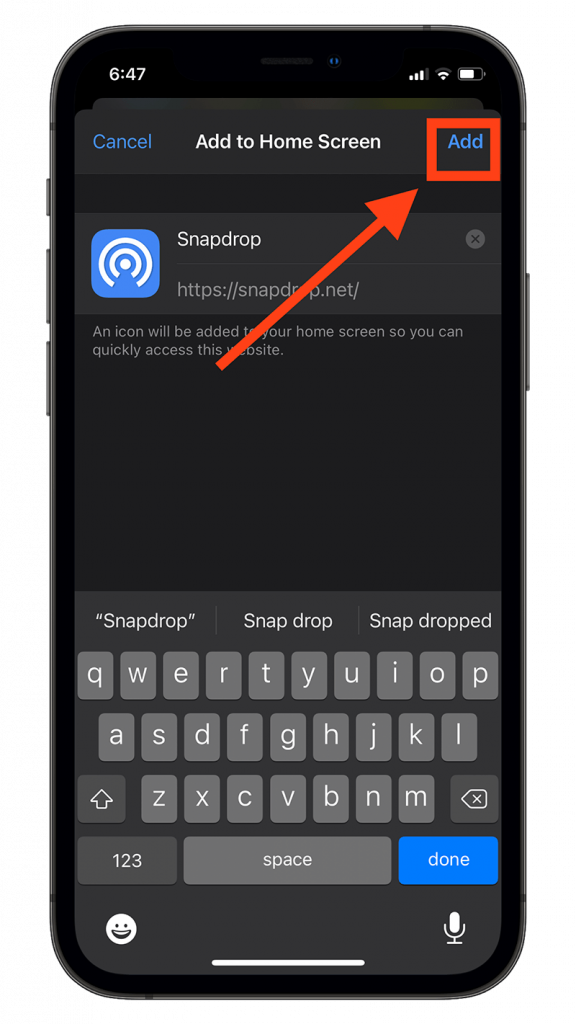
Thankfully, Apple offers a way to save website bookmarks in the form of app icons on the home screen. This will enable you to tap on the Snapdrop icon on the home screen and the website will automatically open in Safari. Here’s how to set up a bookmark icon on your iPhone’s home screen:
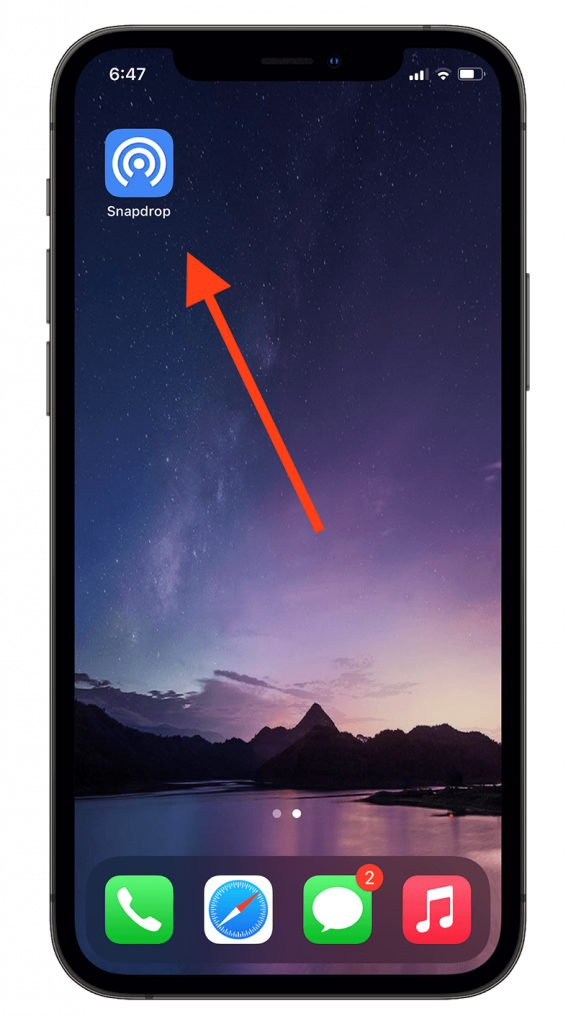
Step 1 Step 2 Step 3 The app icon will appear on the home screen.
- Open Safari on your iPhone. (Note: This will only work if you use Safari)
- Type in https://snapdrop.net in the URL bar and tap go.
- Tap the share sheet icon in the bottom center. (The one that looks like a square with an arrow jutting out of it)
- Tap Add to Home Screen.
- Tap Add. Snapdrop’s icon will be added to your home screen.
How to transfer files from iPhone to a Windows computer using Snapdrop
Transferring files to and from your computer or your iPhone is quite easy. Both your computer and your iPhone need to be on the same Wi-Fi network, though. In this tutorial, I’ll be sharing a Word document from my iPhone to my Windows computer.
- Open the Snapdrop app on your iPhone as well as your Windows PC.
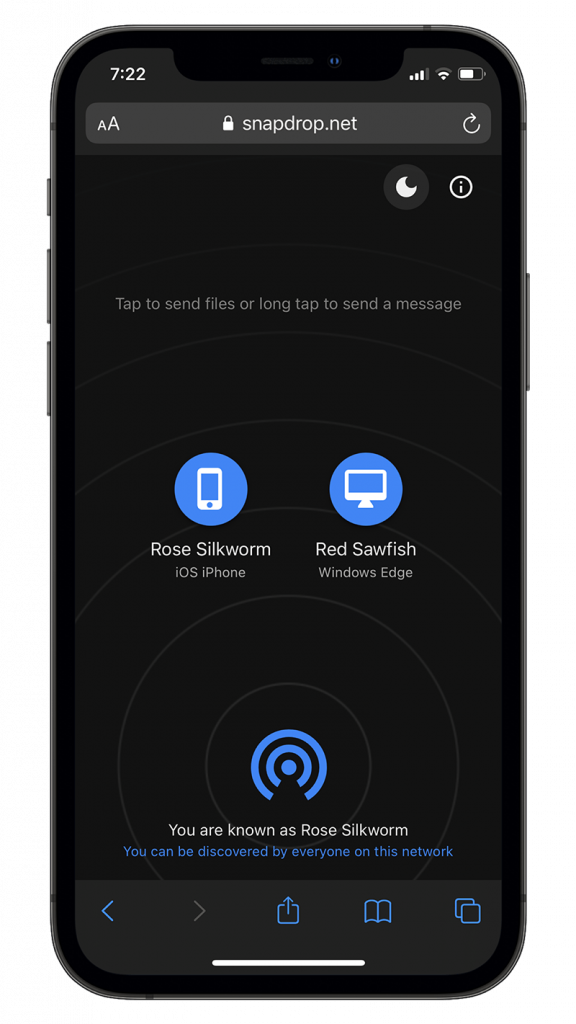
- Tap the desktop icon you want to share the file to. A prompt with different sourcing options will appear.
- Now, you can either choose something to send from the photo library or the Files app. For this tutorial, I’ll be sending a Word document from the files app. For that matter, tap Browse:

- Tap the file you want to send. It will automatically conduct the transfer process.
That’s pretty much it. Snapdrop should prompt you if you want files on your PC to automatically be saved or prompt you each time. If you choose to accept files on your Windows PC to automatically be saved to your designated download location on your PC, the files will appear with only a “plop” sound as a notification.
This is how a file received by a Windows PC looks like inside Snapdrop’s PWA:

Using Send Anywhere
While Snapdrop was a simple alternative to AirDrop, Send Anywhere is a different tool that helps you achieve the same goal: transfer files. Send Anywhere uses one-time codes to conduct transfers. This means in order to send a file to your computer, you will need to generate a code on your iPhone and enter it on your Windows computer.
Albeit, if you have conducted a transfer between your iPhone and your PC using Send Anywhere previously, they will be saved as an option in the list of devices within the app. You can then send files without using a one-time code all the time.
Send Anywhere offers full-fledged apps (not PWA) for both Windows and iOS. Its interface is not that cluttered as compared to similar file sharing apps, and is actually quite simple to use.
A major benefit that Send Anywhere offers is extensions on iOS. With the app’s extension, you can fire up iOS’ share sheet from almost anywhere on your iPhone and initiate the transfer. You don’t need to open the app for this purpose or even have it open in the background. Note that you’ll need to open the app on your PC in order to send and receive files using Send Anywhere.
How to ‘AirDrop’ from an iPhone to a Windows PC using Send Anywhere
While Send Anywhere is available on both iOS and Windows as apps, you can also access it from a browser on either device.
If transferring files is not a part of your everyday workflow and you only intend to send a file once, you’d be better off using Snapdrop instead since it’s much easier and lightweight.
However, if your workflow does involve sending files to and from your computer and your iPhone, you should go ahead and install its app on your devices.
- You can install Send Anywhere on Windows from here.
- You can install Send Anywhere on iOS and iPadOS from here.
Here are the steps to transfer a file from an iPhone to a PC using a one-time code:
For this tutorial, I’m sending a photo from the Photos app. However, note that the following steps are also applicable while sending a file from the Files app.
On your iPhone:
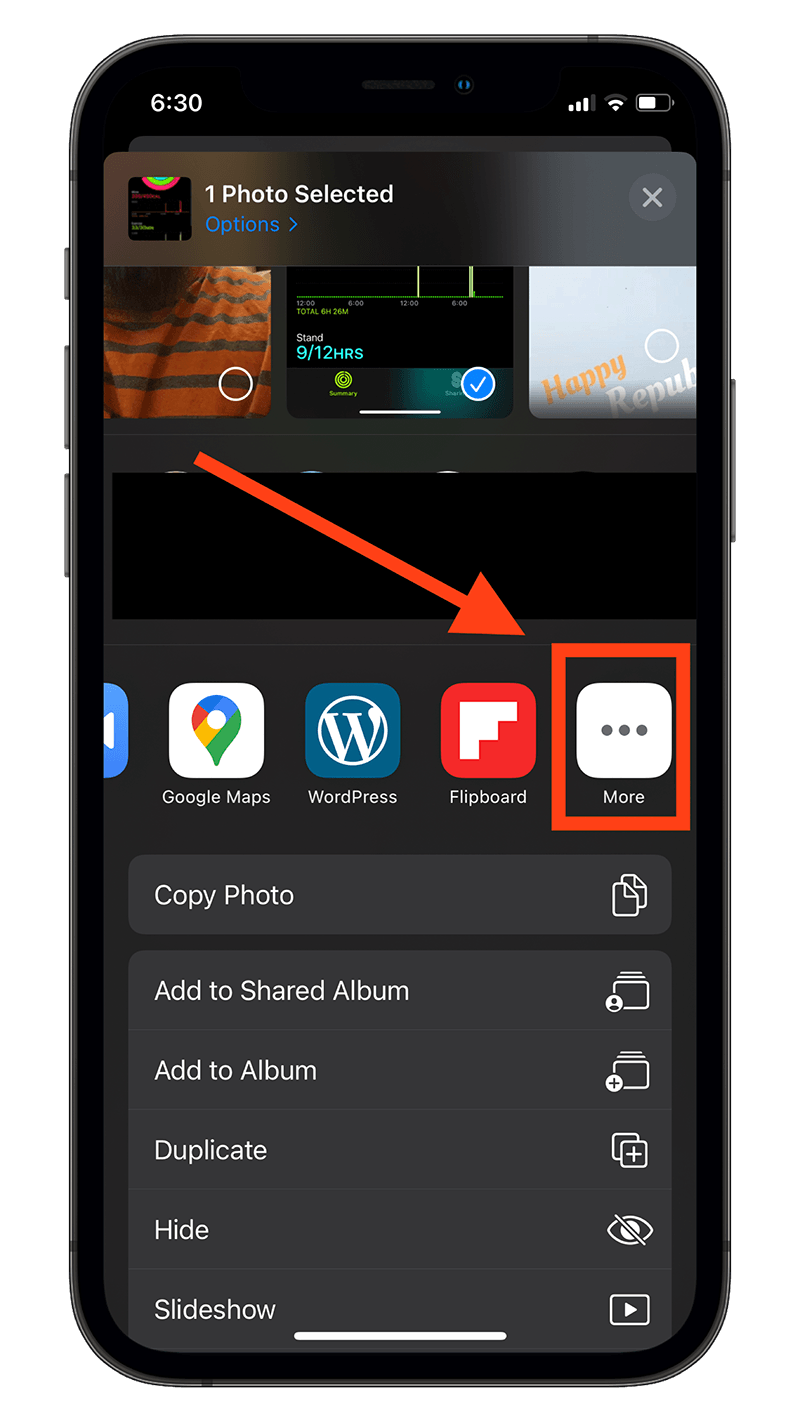
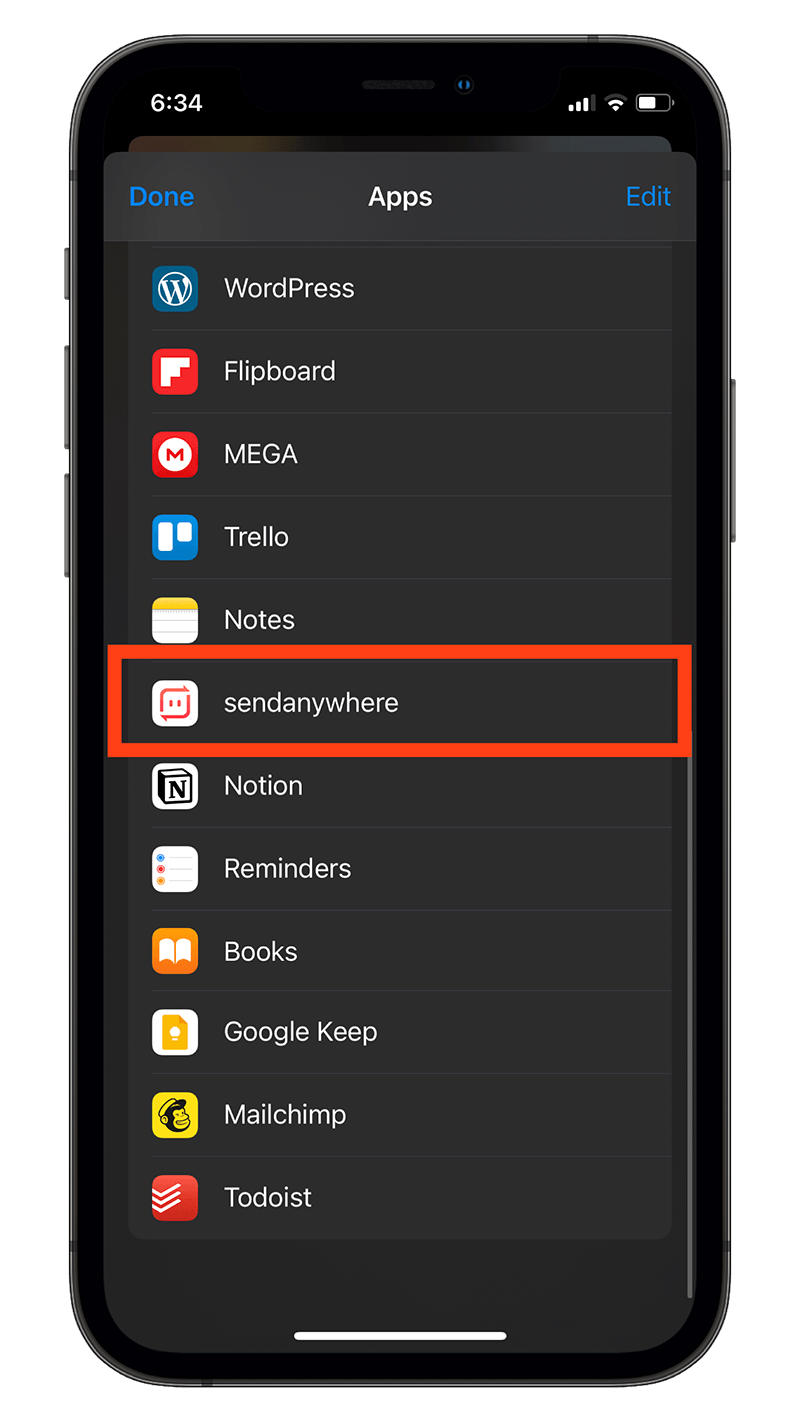
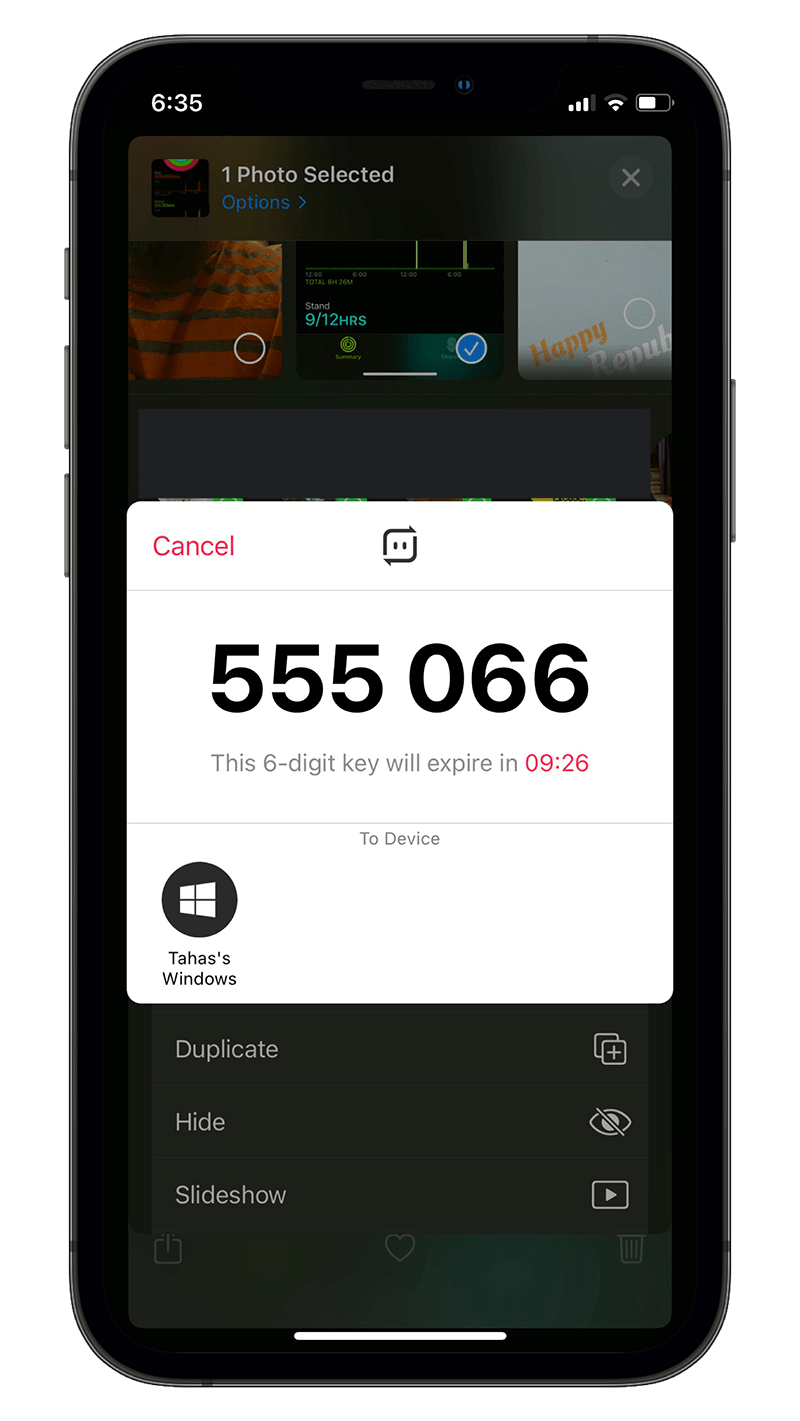
Step 1 Step 2 Step 3 Step 4
- Open the Photos app and choose a photo that you want to transfer to your PC.
- Tap the share sheet icon. (Square with an upwards-facing arrow jutting out).
- Scroll through the horizontal list of apps and tap the button with three dots.
- Tap sendanywhere from the list of apps. A one-time code will appear.
On your Windows PC:
- Open Send Anywhere.
- Type in the one-time key displayed on your iPhone’s screen into the text box under the Receive label.
- Click Enter.

- Send Anywhere should display the name and the size of the file you are about to transfer. Choose where you want the transferred file to be saved on your PC by clicking on the folder icon as shown in the image below.
- Finally, click Download.

That’s it. The file should appear in your transfer history as well as on the location you specified:

Here are the steps to transfer a file from an iPhone to a PC using a permanent connection:
Once you’ve transferred a file using Send Anywhere before, the app registers both devices and lets you share files with a tap of a button without requiring a one-digit code. Note that both your iPhone and your PC must be on the same Wi-Fi network in order for this to work.
That said, the steps to receive a file remain the same. Although, there is a slight change in a step while sending a file from your iPhone relating to this method.
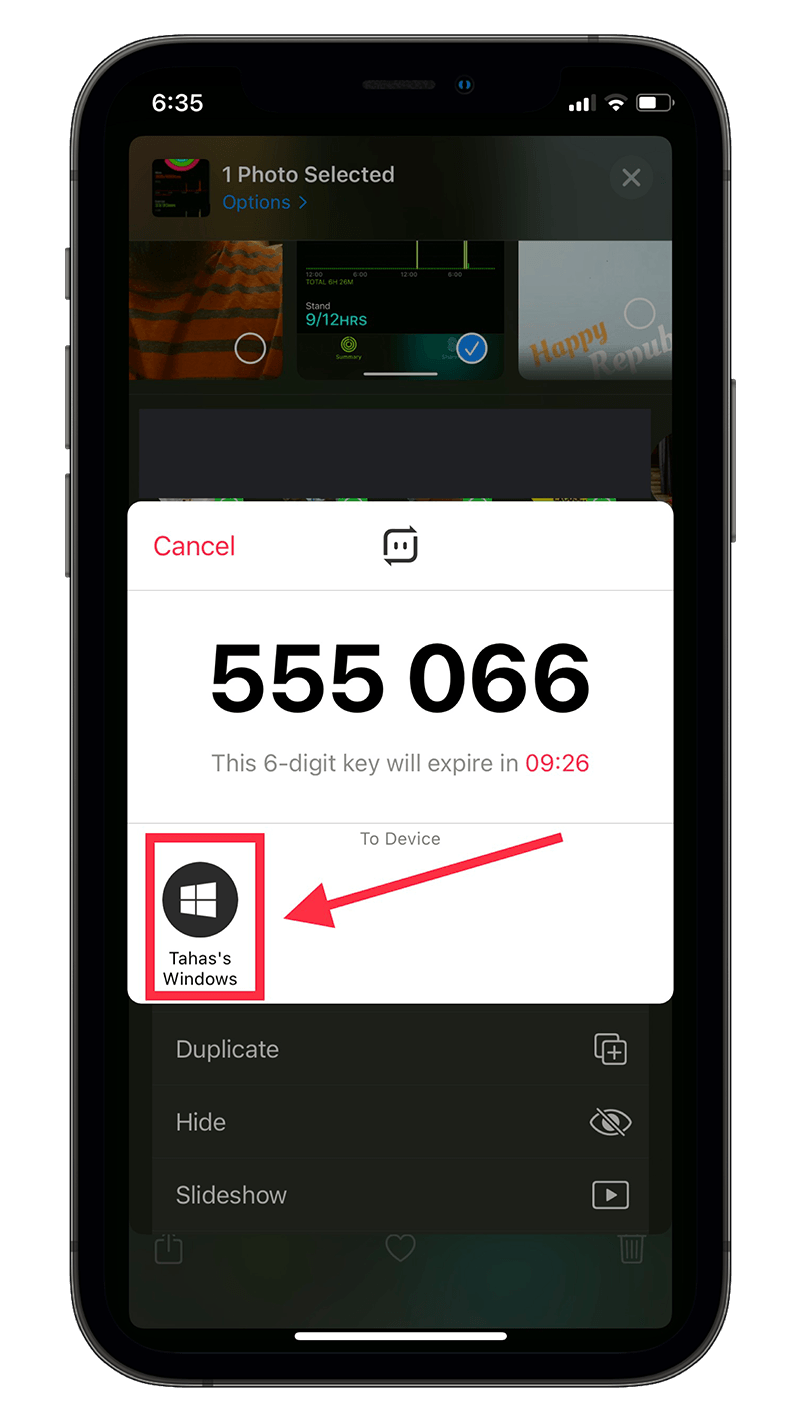
Step 1 Step 2 Step 3 Step 4
- Open the Photos app and choose a photo that you want to transfer to your PC.
- Tap the share sheet icon. (Square with an upwards-facing arrow jutting out).
- Scroll through the horizontal list of apps and tap the button with three dots.
- Tap sendanywhere from the list of apps. A one-time code will appear. Beneath that will be a button with the name of your PC.
- Tap the button with your PC’s name.
That’s it. The file should begin transferring to your PC promptly.
Permissions
Privacy is an important aspect of both services listed in this article. The data you intend to send often might include personal photos, videos, or documents that you’d prefer might not get compromised.
As discussed previously in this article, Apple’s AirDrop encrypts files before transferring them to other devices and since it uses Bluetooth to create a peer-to-peer network instead of just Wi-Fi, it’s more secure due to Bluetooth’s range limit. This means that someone trying to break into your connection and steal your data mid-transfer would have to be close enough to you and still wouldn’t be able to break in due to Apple’s security measures.
While Snapdrop does not use Bluetooth for connecting your iPhone to your Windows PC, it does encrypt your data using the WebRTC encryption standard, which makes it a considerably safe option.
Send Anywhere, on the other hand, also claims to encrypt files before sharing. And the fact that it initially requires a pin to establish a connection means that random users cannot pop in and spam your PC or iPhone.
While those were the security features built into the AirDrop-like file sharing services enlisted in this article, iOS 14 implements its own set of privacy protocols.
First off, when open the Send Anywhere app on your iPhone for the first time after downloading it, iOS 14 asks for a bunch of permissions including letting the app gain access to your local network, allowing access to the photo library, location services, and more.
You can, for instance, allow access to only a bunch of your photos to Send Anywhere at a time, meaning the app won’t have access to your entire photo library. It is, however, essential that you allow access to the app to connect to the local network when prompted or the app won’t be able to send files over to your PC.
Final Thoughts
There is absolutely no lack of file sharing services that help transfer files between iPhones and Windows. But most of those services are either too bulky, are paywalled apps masquerading as freemiums, or ship with serious privacy concerns.
On the contrary, both Send Anywhere and Snapdrop are great alternatives to AirDrop on Windows, with Snapdrop getting much closer to the original AirDrop experience.
Snapdrop is also easier to use as compared to Send Anywhere.
While we can only hope for Apple to launch AirDrop for Windows, until then, these services appear to save the day!
Note: This story contains affiliate links that may earn The 8-Bit commissions on successful purchases to help keep the site running.
