Your iPhone, iPad, and iPod is a very personal device. It holds loads of sensitive information, memories, important data, and much more. By any means, you wouldn’t want to lose that.
Regardless of what a lot of people say, backing up your phone regularly is a healthy practice. You should do it at least once a month. Well, there are a lot of reasons why you’d have to do that. For instance, you may accidentally damage your iPhone or iPad beyond repair and may need to get a new one with your old data intact. Or, you may simply reset your iPhone to clear it up a bit and would want to get old data back.
That said, there are three methods using which you can backup your iPhone or iPad. Each method has its own set of advantages, disadvantages, and underlying implications.
- iCloud
- iTunes
- 3uTools (Third-party tool)
Follow the table of contents below for quick access to indtructions.
Which method should you use to backup?
Before going further, you must decide which method you want to continue with. No matter which method you choose, it’s going to do the job for you. However, each method has its own pros and cons.
That said, what you should do most often is backup your iOS device locally on a computer through iTunes/Finder. It’s completely secure because it’s saved locally instead of on the cloud.
iCloud backups, in comparison, aren’t entirely end-to-end encrypted, except for messages and Keychain data. Previous mishaps suggest that your personal information can be compromised. Its Keychain feature does store passwords and sensitive data like Health and HomeKit information with end-to-end encryption. But intimately personal data like your photos are always at risk.
Moreover, you are not held back by storage limitations while backing up locally, unlike with iCloud.
Another reason you should opt for a local backup is that local backups account for almost everything on your iPhone, iPad, or iPod, and restoring it is quick with data left intact. It’s as if your stuff never left the phone. iCloud does that too, but not immediately. It restores essential data first and allows you to use your iDevice normally while still recovering information like contacts, notes, mail, passwords, etc. in the background.

As for the third-party alternative, it only backs up basic stuff like photos, contacts, and other such information. It lacks support for backing up even iTunes and app data, which is essential in a backup and most tedious while restoration.
Third-party alternatives may also pose security issues, despite saving backups locally. Moreover, they come with a degree of uncertainty. What if the device fails to restore the data that I backed up? What if it messes up something? That’s why you should keep them as a last resort at times if iTunes fails to back up your iOS device locally for some reason.
So, yes, local iTunes backups are the way to go. Look, backing up to a computer might be a little overwhelming. Maybe you’re away from a computer most of the time. In that case, iCloud is your best shot. In other cases, you should absolutely spend time backing up your iPhone, iPad, and iPod locally to your computer.
It’s best, however, if you back up your iOS device in more than one place—preferably iCloud and iTunes—to eliminate the chance of losing a backup.
iCloud
iCloud is Apple’s proprietary cloud service. The entirety of Apple’s services relies on iCloud for sync including features like Handoff, iCloud Photo Library, and more. Complete device backups are one of them.
Backing-up via iCloud is the easiest method to ensure all your data can be restored later on. However, it comes with some caveats. Apple only offers 5GB of introductory iCloud storage space, which is usually insufficient for a lot of users especially if automatic iCloud backups are on.
An iCloud backup consists of device settings, app data, your home screen layout, iMessage texts, photos and videos, and all the purchase history from Apple services associated with your Apple ID.
Here’s everything iCloud backs up.
This amounts to more than a gigabyte of data. So, if backups are set to occur automatically, they could easily fill up the allotted 5GB limit.
However, you can always buy extra storage. Apple says that “everyone gets 5GB of free iCloud storage to get started and it’s easy to upgrade at any time.”
If you worry about exhausting your free allotment of iCloud Storage, you can either turn off automatic backups from within the settings or manually delete backups on a regular basis.
How to back up your iPhone, iPad, and iPod to iCloud
Now, as to how you can back-up your devices using iCloud, it’s quite simple.
Step 1 
Step 2 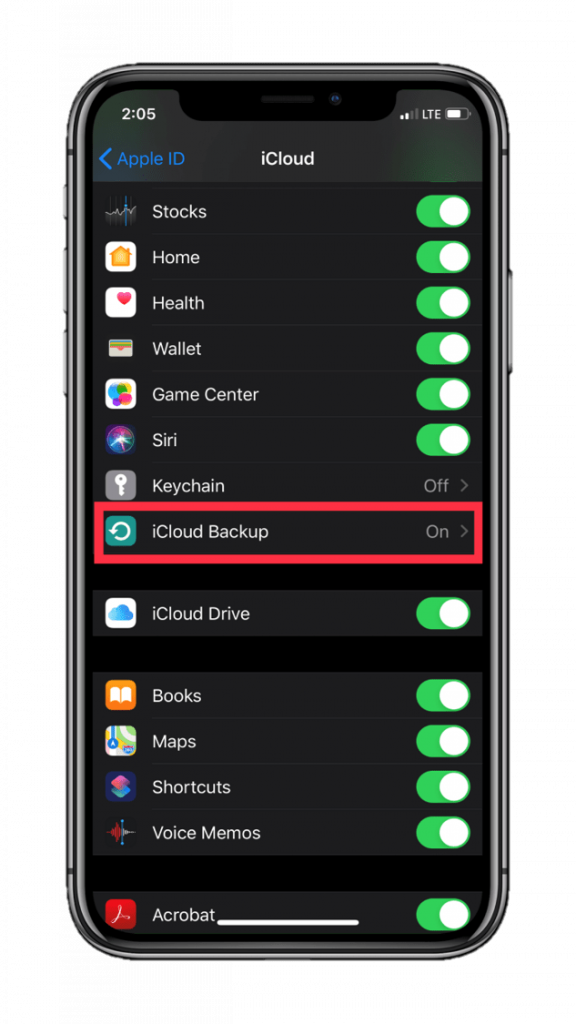
Step 3 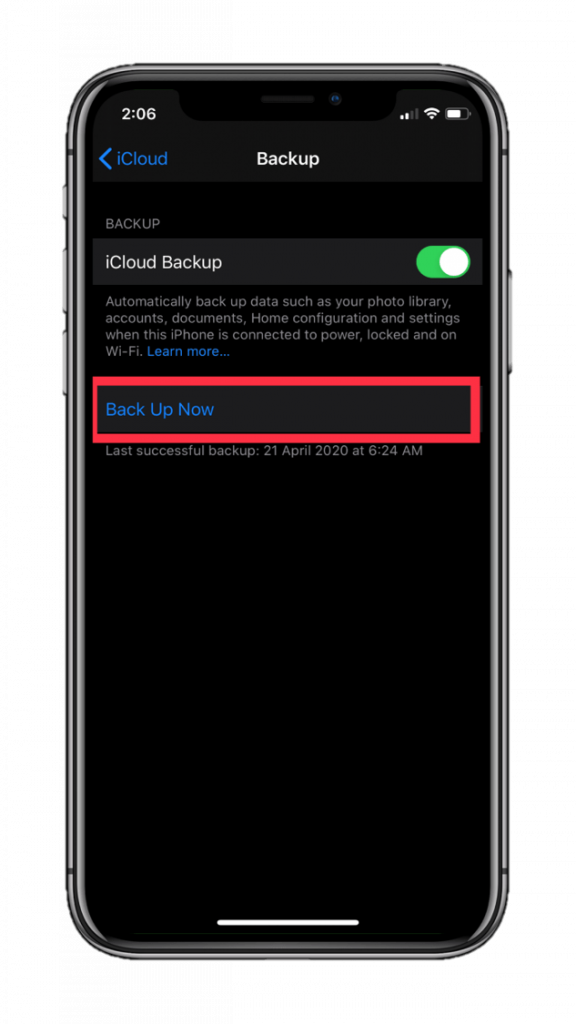
Step 4
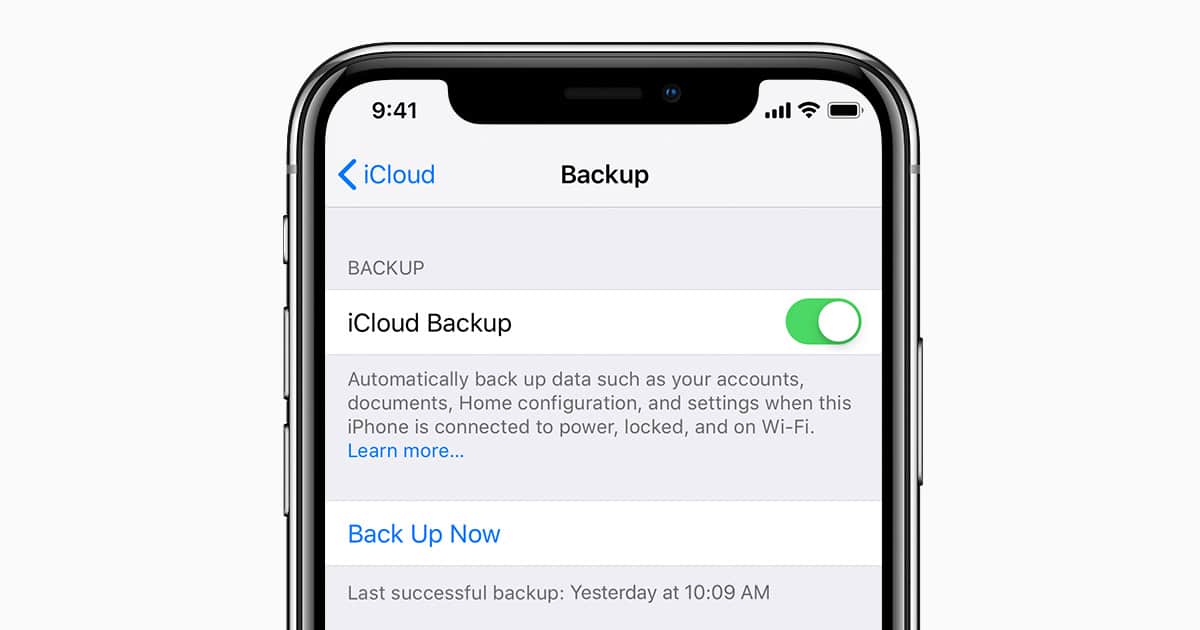
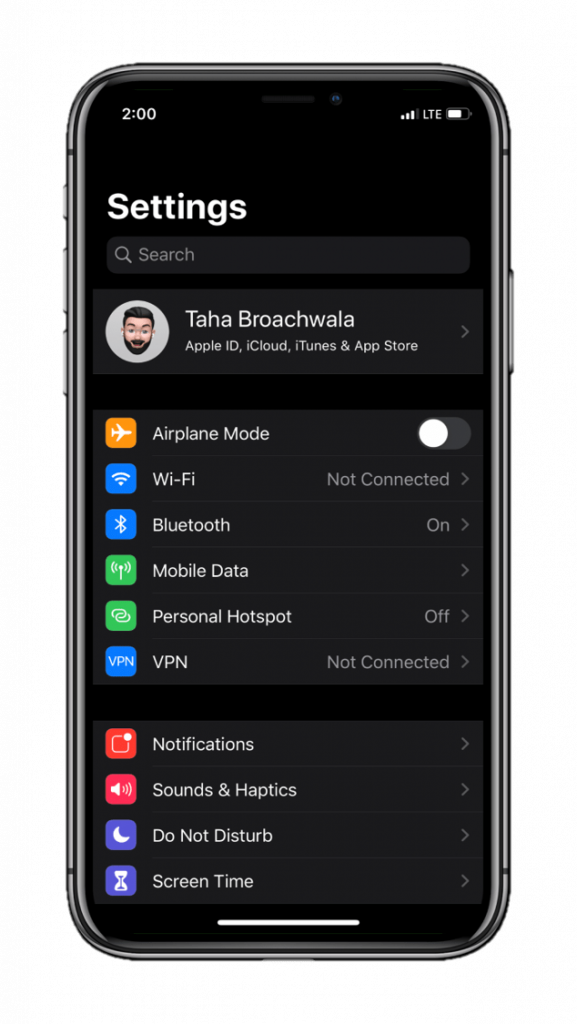
- Go to device Settings.
- Tap on [your name].
- Tap on iCloud.
- Scroll a bit, then tap on iCloud Backup.
- Tap on Back Up Now. (Although make sure you have WiFi turned on your device and that it’s connected to power.)
The time it takes to back up your iPhone, iPad, or iPod after performing the aforementioned steps depends on the internet speed. Further, you can also customize your backup.
Moreover, you don’t have to worry about your passwords and other sensitive data being backed up to iCloud as its Keychain service does that for you. iCloud backups don’t include passwords and authentication data in itself; instead Keychain stores it separately beforehand and restores it automatically once logged into iCloud on your iPhone, iPad, or iPod.
iTunes/Finder
Apple kind of killed iTunes last year. I’m saying “kind of” because it isn’t actually dead, but is fragmented into three separate applications on macOS—Music, Apple Podcasts, and Apple TV. Moreover, iTunes is still available to download as an app from the Microsoft Store in Windows. But, notably, it’s not going to stay for long.
This means that iTunes, for the time being, looks and works exactly the same on Windows. However, all of iTunes connectivity and management features have been shifted to the Finder in macOS.
For the rest of this section, I am going to refer to the finder on Mac as iTunes since much of the functionality as well as design is fairly similar. Here’s how to do back up your iPhone using Finder on Mac.
Now, there are two ways to back up your iPhone and iPad using iTunes on a PC or Mac. One is doing an iCloud backup from within iTunes and the other is doing a local backup to your computer, also, using iTunes.
How to back up your iPhone, iPad, and iPod locally to your computer
Here are the steps for backing up your iPhone, iPad, or iPod to your computer using iTunes. This is a local backup.
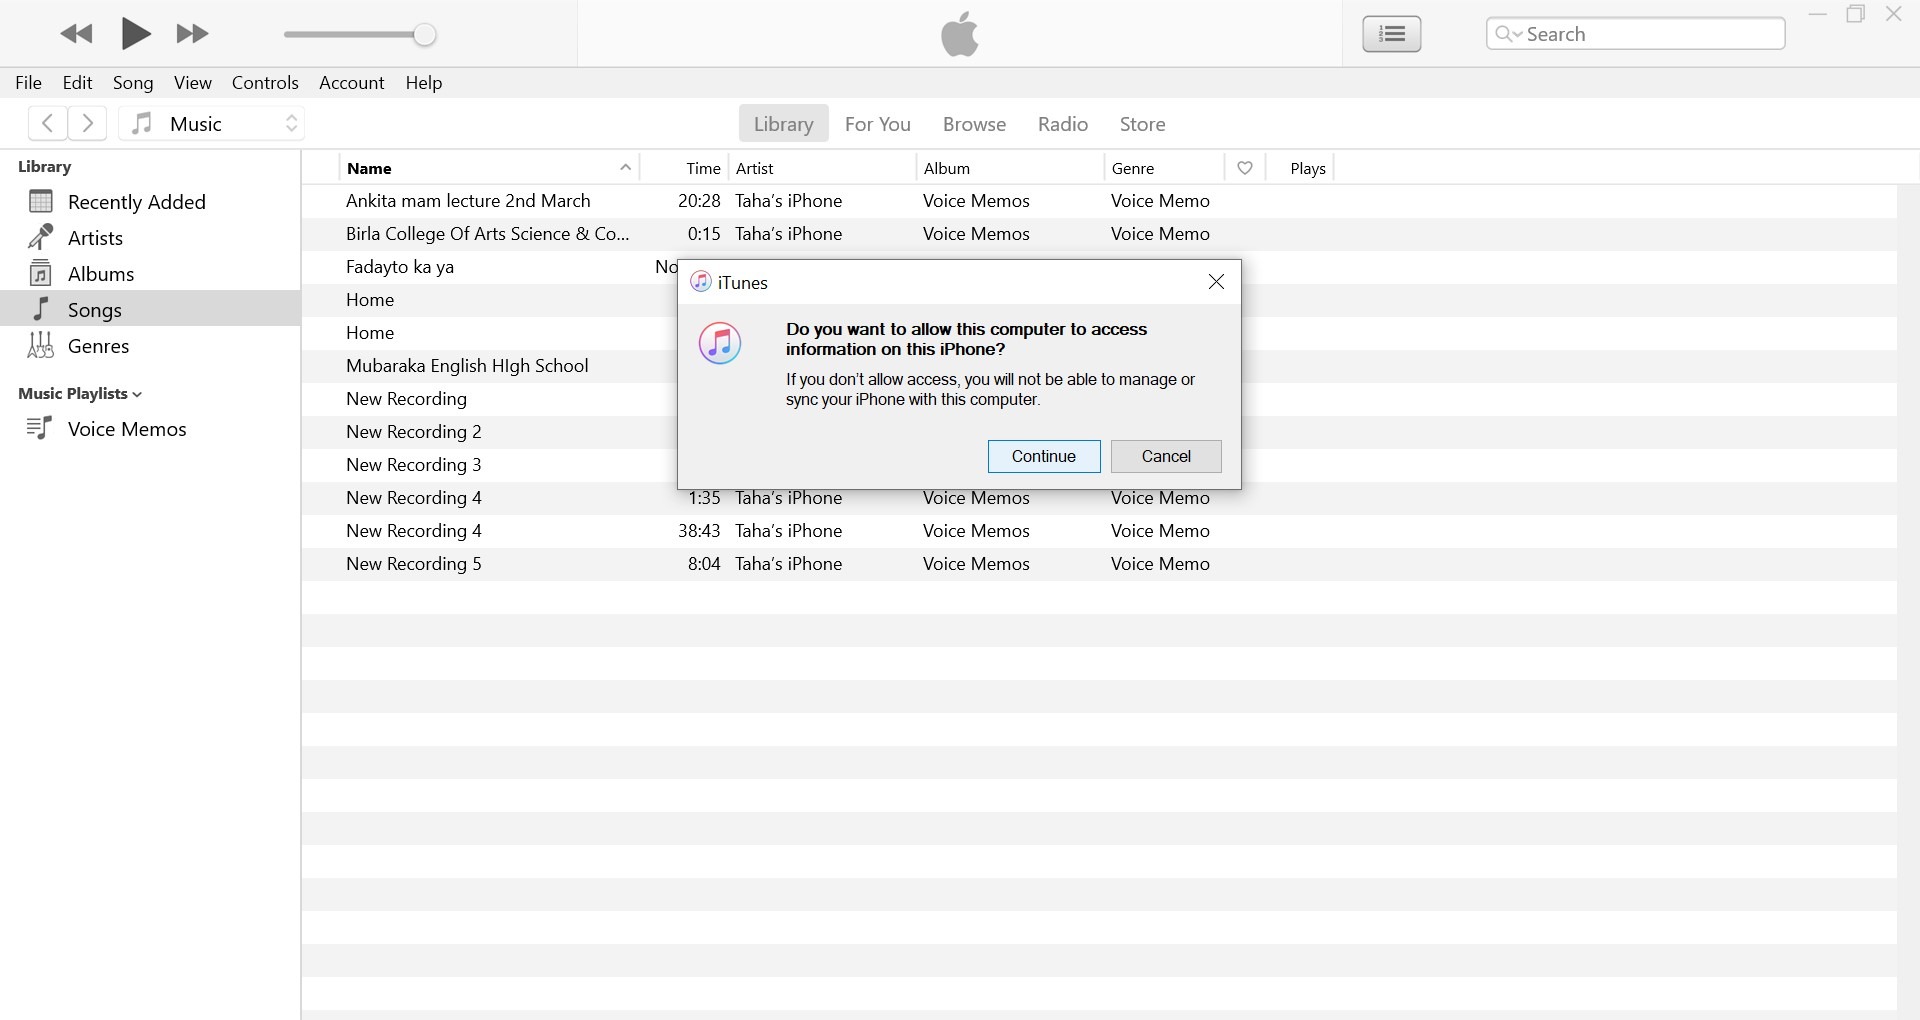
Provide access to your iPhone, iPad, or iPod by clicking on “Continue” on the computer and simultaneously tapping on “Trust” on your device. 
Tap on the icon resembling your device 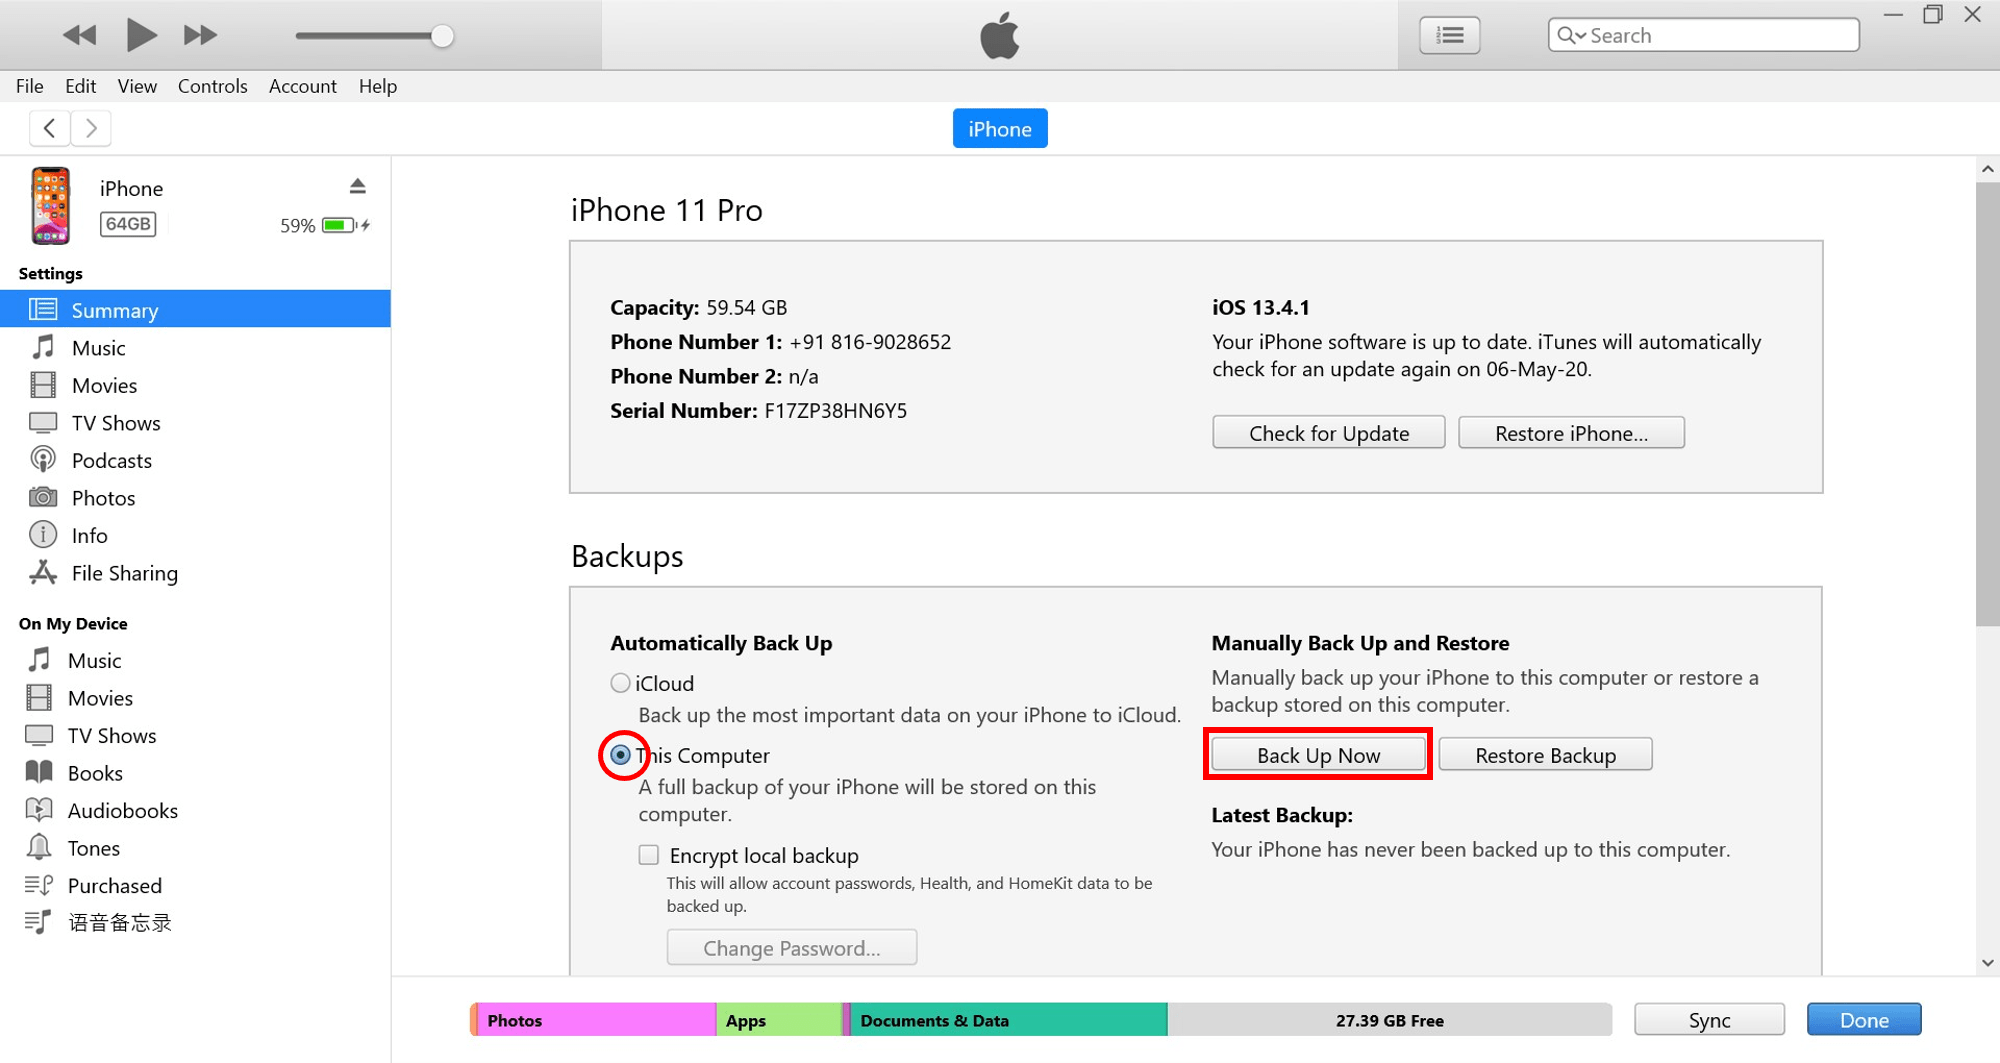
Ensure the backup location is set to “This Computer”
- Open iTunes. (Finder on macOS)
- Connect your device to the computer using a USB-to-lightning cable.
- In order to connect your iDevice to a computer, it is mandatory to provide the necessary validation first. iTunes will ask for access to your iDevice. Click on Continue. Simultaneously, on your iPhone, iPad, or iPod; a prompt will appear asking for permission to connect to the computer. Tap on Trust. Then, continue to enter your iDevice’s passcode.
- On a successful connection, an icon indicating your device will appear in the top left corner of the window. Tap on it.
- Under the Summary tab, check the circle beside This Computer. Mind that this is a local backup.
- Tap on Backup Now.
You can also tick the Encrypt Local Backup option that allows you to store sensitive information like Passwords, Health, and HomeKit data in your backup. This option is useful if you don’t want to manually re-enter most of your usernames and passwords after restoring the backup. Apps on your device that require a login will automatically be logged in.
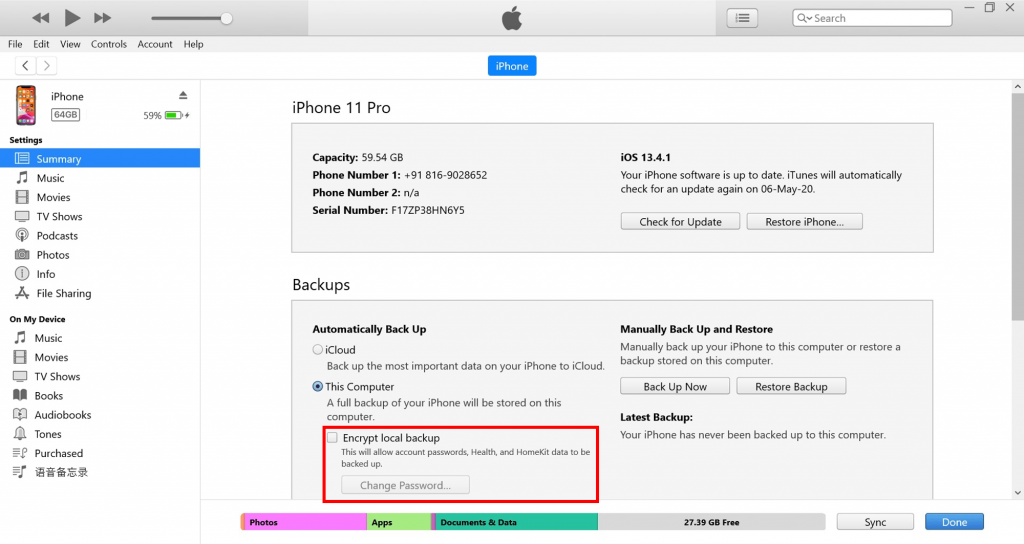
However, encrypting a local backup requires you to set a password that iTunes will ask while restoring the backup. So, make sure to remember the password you originally set if you tick that option. There’s no going back otherwise.
How to backup iPhone, iPad, and iPod to iCloud using iTunes/Finder
Apart from backing up your iDevices to iCloud from the device itself, Apple also allows you to use iTunes/Finder to do that. Both methods are identical and you can rest assured that your backups won’t miss out anything if you went by one method over another.
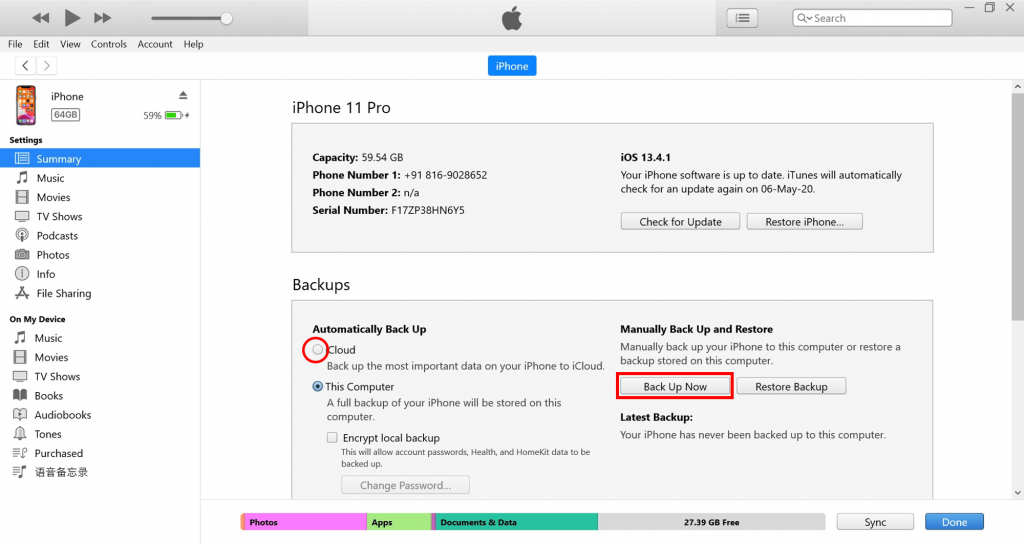
In order to backup your device to iCloud using iTunes on PC or Finder on Mac, just replace Step 5 from the instructions on how to perform a local iTunes backup and select the iCloud option. Then, click Back Up Now. Your iPhone, iPad, or iPod will now be backed up to iCloud.
3uTools (Third-party tool)
3uTools is a third-party tool made especially for iOS devices in order to manage them more efficiently and enable features that are restricted by Apple by default. In order to better explain this, for instance, Apple doesn’t allow users to install ringtones from anywhere besides its iTunes store; but you can use 3uTools to install music and tones as a ringtone on your iPhone, iPad, or iPod.
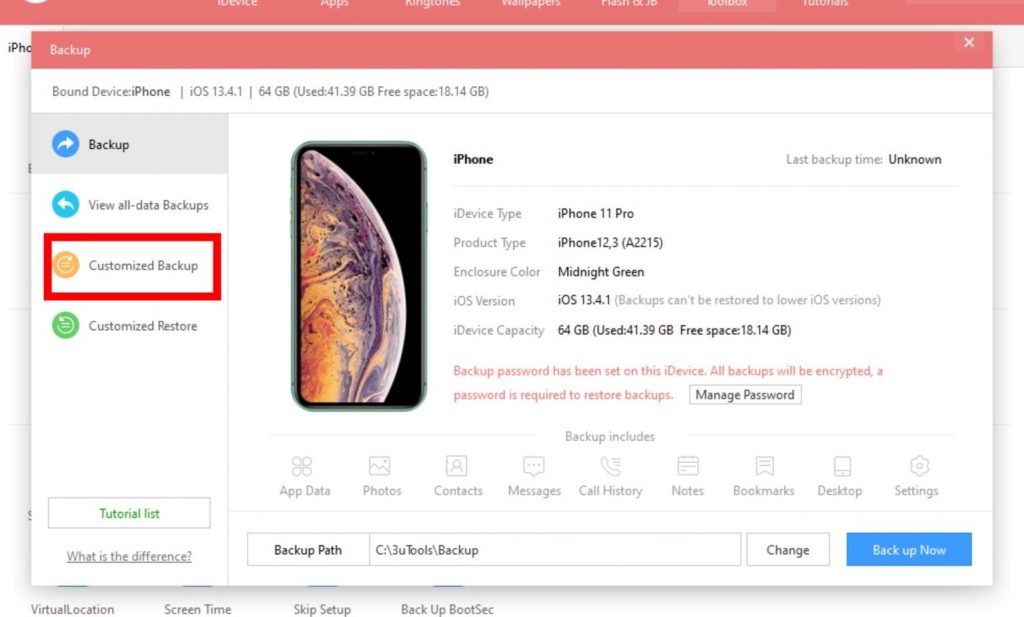
Performing backups is yet another feature among the myriads of tools the software offers. Moreover, you can also customize those backups to include or exclude stuff that you don’t need to be backed up, something that iTunes on PC or Finder on the Mac doesn’t offer.
Note that 3uTools and other similar iDevice helpers that are available online require iOS device drivers to be installed on the computer first. Since these drivers are packaged with iTunes, you will need to ensure your computer has iTunes installed in it first. This problem does not occur on a Mac.
Use this method only as a last resort for backing up your iPhone, iPad, or iPod. This is because third-party software like such could pose a privacy risk and backing up data through it may endanger your data. Also, third-party tools like 3uTools don’t offer complete backups. For instance, 3uTools skips out iTunes data, App data, stuff that you previously transferred from iTunes, TouchID settings, and more; which means you won’t be able to regain pretty much most of the data that matters in a device backup.
How to back up your iOS device using 3uTools.
Step 1: Connect your iOS device to your computer and when prompted, agree to all the prompts that appear on your iOS device. You may also have to enter your iOS device’s passcode at some point.
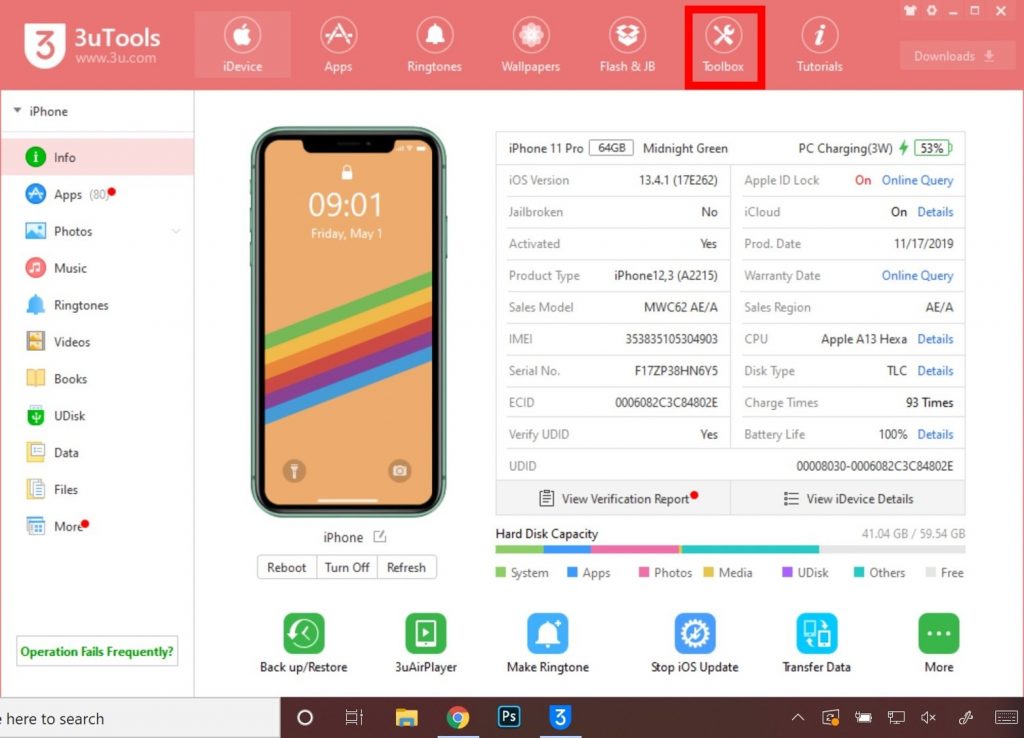
Once connected, your screen must look like this:

Step 2: Click on the Toolbox tab in the upper right corner.
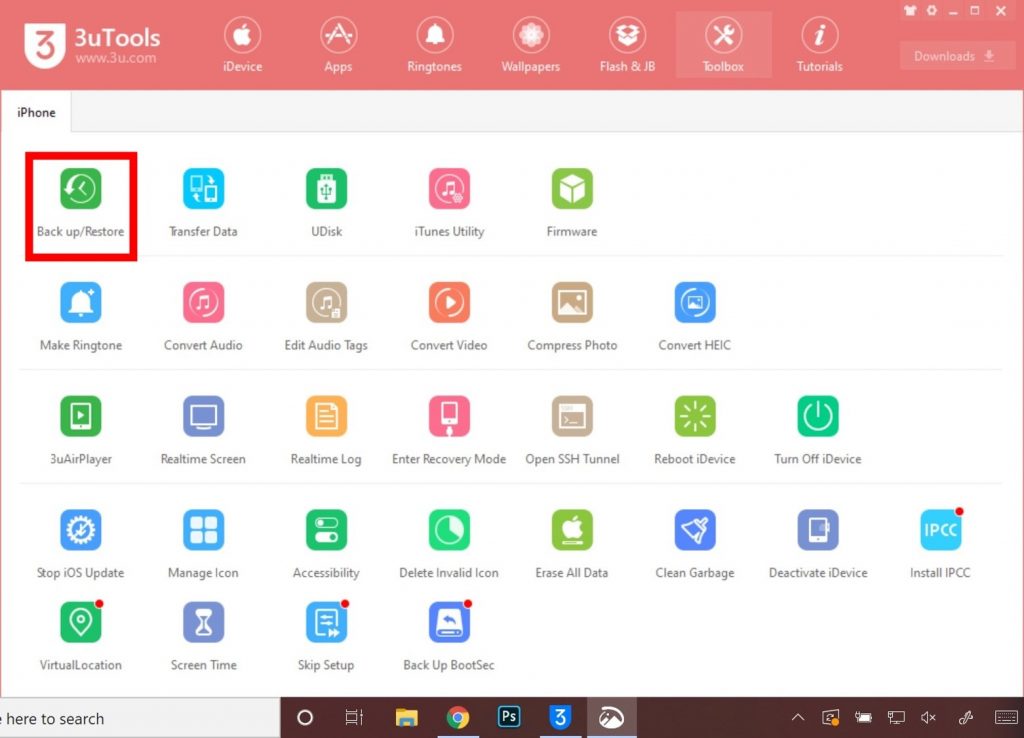
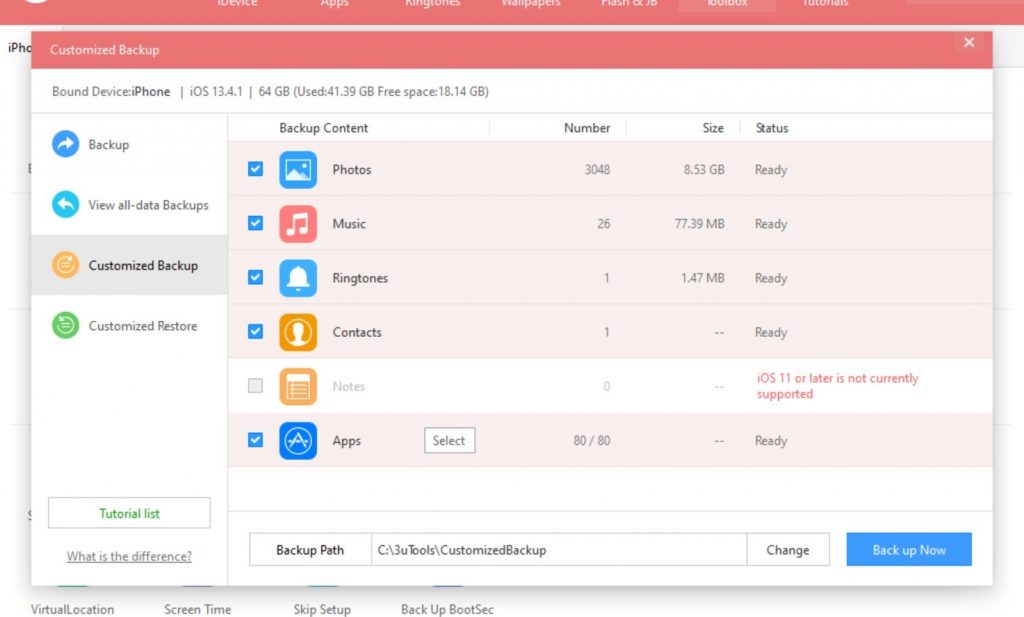
Step 3: In the toolbox tab, click on Back up/Restore. Another window with a backup interface will appear.
Now, 3uTools also allows you to include Activity data, Health data, and passwords in a backup by encrypting it and setting a password for decryption. However, do this at your own risk, especially because third-party software could be sometimes unreliable.
You can select the backup path which is the location on your computer where the backup will be stored. This is something that can’t be done so easily in iTunes.
Step 4: Tap on Back up Now.
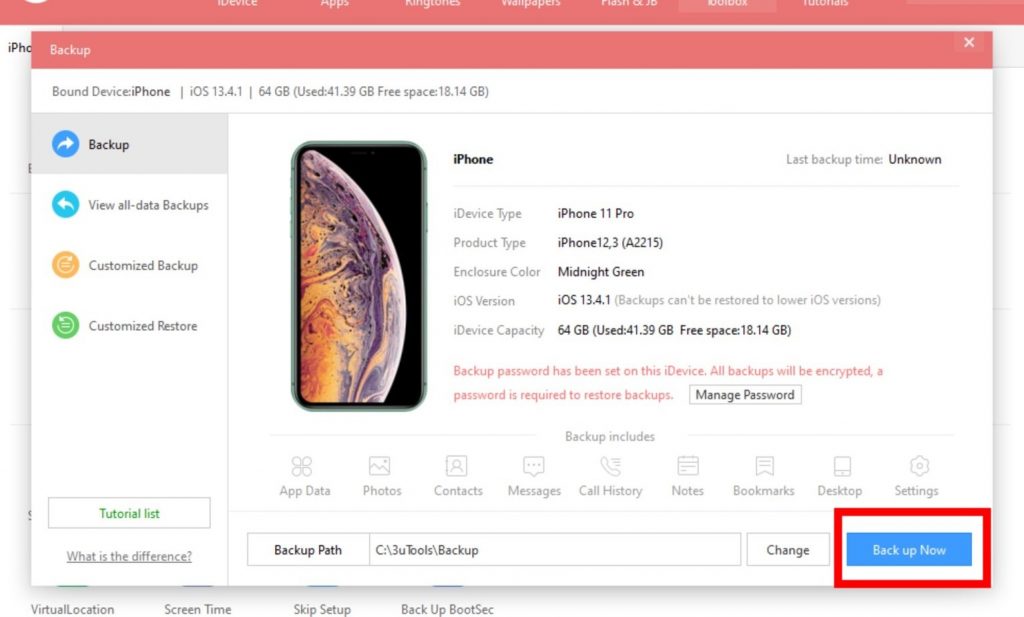
The backup process will initiate. You can also customize your backup by deselecting elements that you don’t want included in the backup.
This was how to backup an iPhone, iPad, and iPod. You can learn how to restore a backup from here.
Conclusion
Backing up your devices is necessary. It’s a task that shouldn’t be taken for granted. Let me know your thoughts in the comments section below.
